Pages

Showing posts with label cupcake. Show all posts

Wednesday, June 20, 2012

Baby Face Cupcake Topper Tutorial 


Now that the carrot cupcakes are done and cooled, it's time to give them a little touch up to make them more interesting. Since these cupcakes are meant for 2 years-old boys birthday, I'm thinking of making some cute baby face from fondant. At first I had this idea to make a small baby figurine to be put on top of the cupcake, but when I came to think of it again, wouldn't it be weird to eat a little baby? Even when it's only sugar paste figurine? So, I decided just to cover them with some cute faces. 

Let's see the steps of making this cute cupcake.....

1. First, cover the cupcake with your icing or buttercream. This time I am using cheese-cream butter-cream.. hhmm..redundancy. :-) Cheese butter cream. Sounds better. 


2. Then, using your rolling pin roll out the skin colour fondant. Since I could not find any skin colour fondant at the store, I mixed orange fondant with white and knead them together until I get the desired skin colour. Oh yeah, you might notice that I use my wooden rolling pin. Yep, I still don't have the fancy fondant rolling pin. It's a bit pricey for me, so I just use what I can find around the house. You can do the same. You can use empty bottle, glass or anything else you can find around the kitchen to substitute a rolling pin. Don't forget to powder it with a bit of flour so that the fondant won't stick to it. 


3. Cut the flatten fondant round. I use my round cookie cutter, but again you can use any round stuff around the kitchen. Be creative. Just make sure that the size is suited to cover your cupcake. 


4. Place the round fondant on top of your cupcake. Give a light touch to smoothen it. Try not to press it too much otherwise you might leave your fingerprints all around the fondant. 


5. After you're done covering the cupcake with fondant, set it aside. The next thing you want to do is preparing the baby hat to cover half of the fondant. This time I'm experimenting with some marbled effect. For that you might want to prepare 3 balls of different colours fondant. 
PS: Please note that I only use the fondants below for picture purpose only. That's why they are a bit small. If you intend to cover around 12 cupcakes, you might want to make bigger size of balls. 


6. Using both hands roll the fondants into sausage shape and lay them adjacent to one another.


7. Twist them together making one big sausage with colours overlapping one another. 


8. Do it several times until the colours blend to each other. 
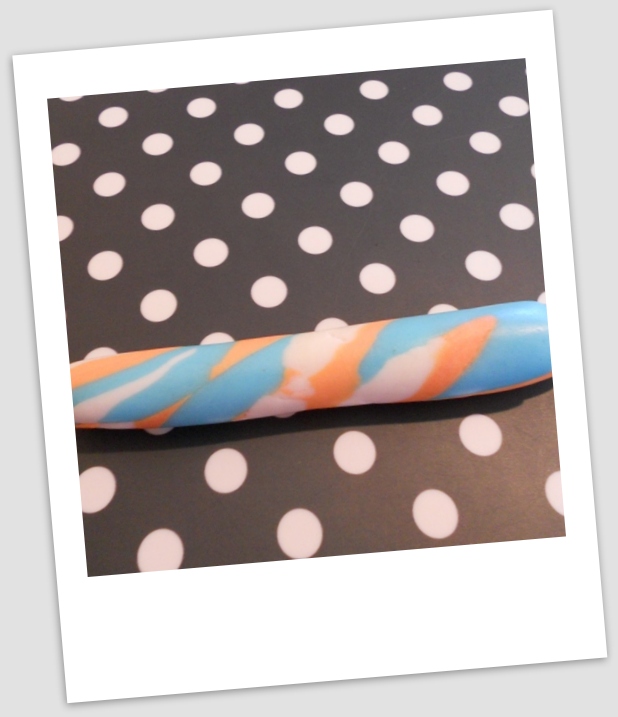


9. Roll it again. And you might end up with this kind of colour.


10. This is how the other side would look like. You can choose the side you want to have. I choose this one.


10. Using the same round cutter you use for the cupcake cover, cut it round again.


11. With a knife, slice them into halves. 


12. Place one half on top of the cupcake. It will serve as the hat of the baby face. With a little brush, use a little of water to glue the pieces together. Fresh fondant usually is still easy to stick, but fondant gets hard very quick and you might want to use a bit of water as glue. 


13. You might also want to add up a little detail to the hat. It's all up to your creativity. I just poke little dots around the edge and make some stripes using a knife. Try not to cut it too deep. You just want to add some details and not cut it apart.


14. Here is how it looks like in the end.


15. Using the rest of the fondant, I cut a small stripe to add up a little detail at the bottom of the hat. 


16. Make a small tiny ball for the tip of the hat. Again, it's up to your creativity. You can also add a bow or anything you like. 


17. Now, let's do the face detail. Make 2 small holes to indicate where you want to put the eyes. Another small tiny ball for the nose and two small balls for the ears. 


18.  For the pacifier, flatten a small ball and add a tiny ball in the middle. Place it where the mouth should be. 


19. You can also carve a little smile instead of a pacifier. 


There it goes.... 
It's very easy right. You don't need any fancy tools to make this cute cupcakes. Go give it a try and share this sweet treats to people you love. They will love it. 


See this creation and more on www.MiNiBakes.nl

Sunday, June 10, 2012

Cake Topper - Rose Flower from Fondant

      Making a beautiful rose to put on top of your favorite cake is not as difficult as you may think. With simple tools that you can find around your kitchen, you can create it with no hustle at all. That's exactly what I do since I don't have many fancy cake tools. They can be a bit pricey sometimes. So here I'm sharing you my simple way to make rose flower cake topper from fondant or gum paste. 


Tools you might need :

  • Sharp kitchen knife.
  • Plastic file folder. The one you usually use to save your files/documents. I use a zip-lock since I couldn't find any plastic folder in the drawer. Cut the edges leaving one edge left.
  • Small tip brush and a bit of water as glue if needed.


Steps :
1. Make 1 big ball of fondant of any colour you like and a few of small balls for the petals.


2. Take the big ball. Roll the bottom part of it using your palms forming it into a cone. 


3. Put it on the mat with the pointy part upward pressing the fat part on the bottom. Flatten it as the base of the flower. 


4. Using your pointers press the area between the cone and the bottom. Give it a slight press and roll it gently.


5. This is the result you want to get. The cone will be the pistil of the flower. Set it aside.


6. Put 3 of the smalls into the plastic folder. Cover them.


7. Using the back of your palm press each of the balls. 


8. Flatten the balls one by one leaving the back part a big thicker than the front. You might want to flat the front part pretty thin to make the petals looks more real.


9. Once you got the desired size of each ball. Take one of it and wrap it around the pistil cone you made before. Press the bottom part to the gap between the bottom and the cone to stick it together. Fresh fondant is still easy to paste. If your fondant has dried out a bit use the brush and a tip of water to glue them together. 


10. Continue doing it to the other flattened balls. 


11. You can add up as many petals as you want depending on how big you want your rose to be.


12. Once you get the desired flower, give a little press at the bottom of the flower to stick the petals together and cut it using a knife. 


13. Make little frill on the edge of the petals to give real effect of the rose. You can use your fingers to do it or the knife, but be very careful not to leave any scratching mark on the petals when you're using the knife.


14. There you have a pretty rose flower to use as a topper on your cake or cupcakes.


Good luck! 

Monday, June 4, 2012

Basic Vanilla Cupcake

Here is my basic vanilla cupcake recipe that I use for most of my cupcakes. The recipe is pretty easy to follow and the result is amazing. Soft and indulgent. The ingredients are easy to get, and I believe most of them are already in your cupboard just waiting for you to grab and mix.


Ingredients:
175 gram unsalted butter, room temperature
175 gram castor sugar
175 gram all purpose flour, sifted
1/4 tsp salt
1/4 tsp baking powder
1/4 tsp baking soda
3 eggs
3 tbsp buttermilk/whole milk
1 tsp vanilla extract


Steps:
1. First thing you want to do is pre-heat your oven to 180C. 

2. Line your cupcake tin with cupcake liners. 

3. Mix all your dry ingredients together (flour, baking powder, baking soda, and salt). Sift it. 


4. In a big bowl, mix the butter and sugar together until they are creamy, soft and fluffy. 
Take your time to cream them, around 5 minutes. The more you cream it the better texture of cake will you get.


5. Add in the vanilla extract to the batter and keep on mixing.


6. Add one egg at a time, you might also want to add a teaspoon of flour to stop the mixing from getting to loose. Do this again for the other 2 eggs.


7. Next thing you want to do is add in the dry ingredient. Add 1/3 of the dry ingredient and mix it. I would recommend using spatula or whisk to avoid over-mixing which will cause the result cake becoming to dense and more like a bread instead of a moist cupcake. 


8. Then add 1tbsp of milk, mix it. Add another 1/3 of the dry ingredient, alternately adding in the milk until all the dry ingredient and milk are done. 


9. Mix them thoroughly using spatula just enough to get all the batter incorporated. Remember, DO NOT OVERMIX.


10. Divide your mixture into your cupcake tin evenly. 

11. Put it into the oven for about 18-20 minutes or you can test it by inserting a toothpick into the cake. And when it comes out clean that means your cakes are ready. 

12. Let them cool completely before you start decorating them. 


Have fun trying the recipe!

Check out more of my creations at www.MiNiBakes.nl